

**Book a free security consult →
Lost keys are still the weakest link in building security. This complete guide door access shows how modern systems work and helps you pick the right fit for your site in 2026.
A door access control system checks a person’s credential at a reader, asks a controller for a yes/no decision, and unlocks the door if allowed. In addition, networked systems create logs, alert you in real time, and pair with video for fast, confident responses. You’ll see how to choose credentials, cloud vs. on‑prem, and where tools like AI video give you unauthorized access detection you can act on.
What Is a Door Access Control System and How Does It Work?
At its core, access control decides who can open which doors and when. The system checks a credential, verifies it against rules, and drives the lock. That’s it. The benefits stack up from there: event logs, schedules, real-time alerts, and links to cameras for fast checks. For background on the concept of authorization, see Access control.
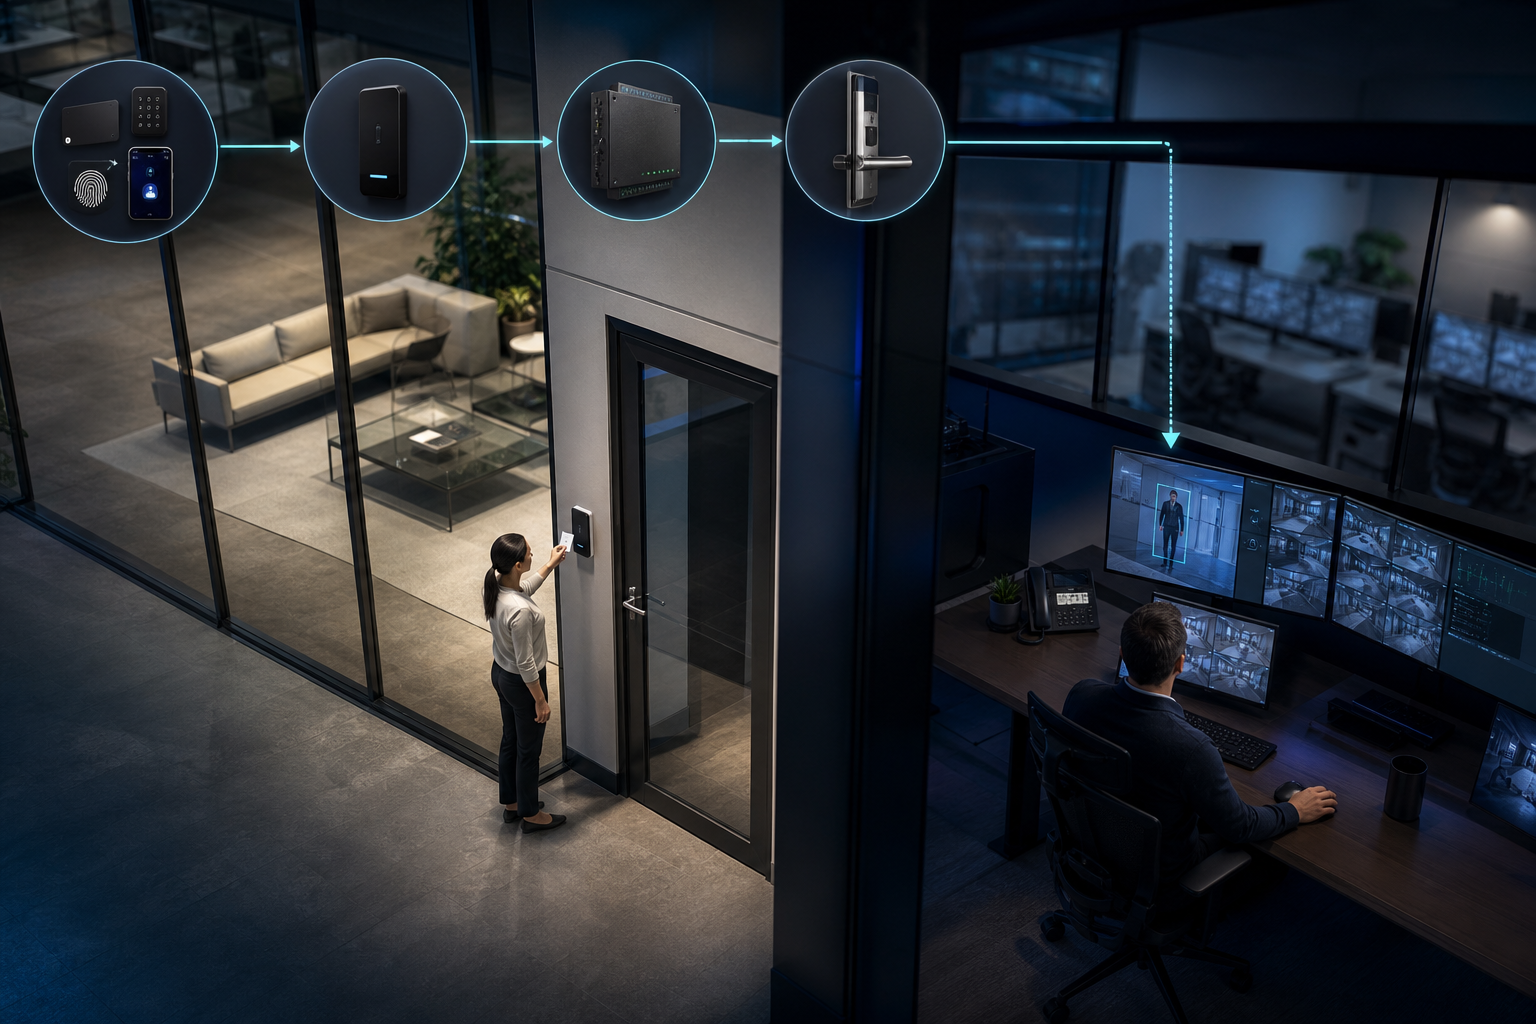
Here’s the basic chain in plain terms:
- Credential: What you present (card, fob, phone, PIN, or biometric).
- Reader: The device that “hears” the credential.
- Controller: The brain that checks rules and decides allow/deny.
- Lock/door hardware: The part that opens or stays shut.
Standalone vs. Networked
- Standalone: The reader and controller are one unit at the door. You program it locally. It’s low-cost and fine for a few doors, but it offers limited logs and no live monitoring.
- Networked: Readers connect to a control panel or PoE controller that talks over your network or the cloud. You get centralized management, audit trails, remote unlock, and real-time alerts.
Moreover, networked systems make it easy to add rules like “cleaning team can enter 6–9 pm” or “IT lab is biometrics-only.” They also integrate with intrusion systems and video to flag unauthorized access attempts as they happen.
Where Smart Detection Fits
Modern platforms can layer in unauthorized access detection and face recognition through video analytics. For example, if a door is forced after a denial, an automated clip with a timestamp and camera location can reach your team in under a few seconds. As a result, you move from “find it later” to fast action with proof.
Tip: If you only have two or three low-risk doors, a standalone keypad might do. If you need audit trails, remote control, and real-time alerts, use a networked system.
How to Choose the Right Door Access Control System: A Step-by-Step Framework
Picking access control is less about the badge art and more about fit. Follow this five-step plan to avoid rework and keep users happy.
Step 1: Audit Entry Points
Walk every exterior and interior door you care about. Note traffic volume, risk, and special rules. High-risk points (server rooms, pharmacies, labs, cash counts) warrant stronger controls and tighter logs. Low-risk points (closets) may be fine with PINs. Also, mark doors that must fail-safe for life safety, and doors that can fail-secure.
- Count the doors that need control now vs. in 12–24 months.
- Note power availability and cable paths.
- Flag doors that need ADA operators or intercoms.
Step 2: Pick the Credential Type
Choose what people will present at the reader:
- Keycard/fob (RFID): Low cost, easy to issue, but can be lost or cloned if legacy tech.
- PIN: No card to lose, but users share codes. Use as a second factor, not alone.
- Biometric: High assurance, no tokens to lose. Plan for privacy and liveness checks.
- Mobile (BLE/NFC): People carry phones; fast issue/revoke. Plan for dead-battery fallbacks.
Furthermore, combine factors at high-risk doors. For example, mobile + PIN, or card + biometric.
Step 3: Cloud vs. On-Premise
Cloud management cuts server costs and speeds updates. You can manage sites anywhere and push changes to all doors at once. On-prem can fit strict offline or air‑gapped needs but adds server care. If you want no racks or VMs to maintain, aim cloud-based with no need for on‑premise servers.
Security note: If you choose IP-based systems, align with IT on network segments, TLS, and least-privilege accounts. Rotate API keys and admin creds twice a year.
Step 4: Integration Needs
List systems you must connect:
- Video: For video verification, event-linked clips, and face recognition at high-security points.
- HR/Identity: For automatic add/change/terminate.
- Alarms/Intrusion: For door‑held‑open, forced-door, and unauthorized access alerts.
- Visitor Management: For QR or temporary mobile passes.
If you already have cameras, prefer platforms that work with existing cameras across 200+ brands. That keeps your project in budget and avoids forklift upgrades.
Step 5: Plan for Scale
Design for growth today. Pick hardware that can scale from a few doors to dozens of sites. Likewise, if you plan deeper video coverage, choose software that is scalable from 20 to unlimited cameras so your audit and alerting won’t hit a ceiling.

Specifically, write down the doors you’ll add in phase two, and pick readers and controllers that can flex. That choice saves weeks of rework later. This section of your plan anchors the complete guide door access you are building for your team.
Also Read!
The Complete Guide to Fisheye Cameras: How They Work, When to Use Them, and How to Choose One
The Complete Guide to Dome Security Cameras: How to Choose, Install, and Get the Most From Them
5 Common Mistakes When Installing Door Access Control
Even smart teams trip on the same pitfalls. You can dodge them with a short precheck.
First, ignoring fire code egress rules causes delays and fines. Doors on exit routes must allow free egress at all times. Confirm fail-safe vs. fail-secure per door and coordinate with your Authority Having Jurisdiction. For reference, see the OSHA exit routes standard.
Second, choosing standalone when you need a networked system leads to lock‑in. If you need audit trails, remote unlock, or real-time alerts, start networked. Third, skipping audit trails hides who did what and when. Without logs tied to users, your investigations will stall.
Fourth, neglecting cybersecurity on IP-based gear leaves doors exposed. Therefore, segment controllers and readers, patch firmware, disable default accounts, and use MFA for admins. Fifth, failing to plan for visitor management results in lobby jams. Decide on QR passes, sign-in flows, and badge policies before launch.
Quick Pre-Install Checklist
- Confirm egress hardware and door swing per code.
- Map network drops and PoE budgets for readers and controllers.
- Define log retention and audit report needs by role.
- Select a visitor process (host approval, QR, or badges).
- Test door‑held‑open and forced‑door alarms with security.
By running this checklist, you keep your complete guide door access project on track, and you avoid costly rework in week one.
Tools and Technologies That Complement Access Control
Access control shines when paired with smart eyes and clear voice. Start with video verification: when a denial or forced‑door alert fires, link the event to a short clip so your team can verify in seconds. Add intercom at doors with frequent exceptions so staff can talk and grant time‑bound access without a site walk.
In addition, visitor management software smooths front‑desk flow. Guests can receive QR codes, and hosts can be pinged as they arrive. For after-hours sites, AI-powered surveillance can watch zones and send unauthorized access alerts even when no one is at the monitors.
One option is tools like VideoraIQ, an AI video intelligence layer that integrates with existing IP-based CCTV systems without additional hardware. It provides intrusion detection, face recognition, and real-time alerts with video proof, a location tag, and a timestamp. Per its published stats, it delivers 99.4% detection accuracy, <3 seconds alert latency, and monitors 10,000+ cameras across 7+ countries, with GDPR and HIPAA compliant practices. Its tiers range from up to 20 cameras (7‑day retention) to up to 200 cameras (30‑day retention) and enterprise with unlimited cameras and 90‑day retention. In 2026, pairing this kind of video layer with your access events closes gaps and speeds response.
Why Pair Video and Access?
- Faster triage: A 10‑second clip beats a blind alarm.
- Fewer site visits: Intercom + video can resolve doors remotely.
- Better records: Video with timestamps adds context to audit logs.
- Smarter alerts: Analytics can watch for line-crossing or loitering near high‑risk doors.
As a result, your team moves from “search the timeline” to “act on proof,” and your users spend less time stuck at doors.
What to Do Next: Your Access Control Action Plan
Here’s a short plan you can run this week:
- Walk your facility. List every door to control now and in the next 12 months. Note egress and ADA needs.
- Choose your credential mix (keycard, PIN, biometric, mobile) by door risk. Write down fallbacks for power and dead phones.
- Decide cloud vs. on‑prem with IT. If you want no servers to manage, pick a cloud-based platform and document your data retention.
- Map integrations: video, HR, alarms, and visitor management. Confirm they work with your existing cameras across 200+ brands if you have them.
- Request demos from 2–3 vendors. Bring a test use case: after-hours access to a lab with video proof and a 2‑factor rule.
Moreover, check compliance needs by industry segment. Corporate & Enterprise teams should align logs with internal audit. Healthcare needs role-based access and privacy screens near nurses’ stations. Education should plan for lockdown modes and visitor flows during peak hours. Manufacturing should test door‑held‑open alarms on bays and link alerts to supervisors.
Add each finding to your internal brief. That document becomes your complete guide door access plan for approvals, budget, and rollout.
**Schedule a free project review →

Key Takeaways
- A door access system hinges on a simple chain: credential → reader → controller → lock.
- Networked beats standalone when you need logs, remote control, and real-time alerts.
- Match credentials to risk: mobile and biometrics for high‑risk doors; cards and PINs for low‑risk.
- Integrate video, intercom, and visitor tools to cut response time and add proof.
- Plan for egress rules, cybersecurity, and visitor flows before you install a single reader.
What to Do This Week
Walk your site, mark door risks, and write the must‑have features. Then book 2–3 demos and test one live scenario end‑to‑end, including a denied access event with video verification and a visitor pass. By next Friday, you’ll have a clear path and a budget you can defend for 2026.